Wednesday, February 22, 2012

Exploring the craft of letterpress printing


Earlier this week I spent a delightful evening taking a letterpress printing class at San Francisco's Center for the Book. We learned how to set lead type, and learned to mix inks then used two different kids presses.


The craft of letterpress printing and the tactile nature of what is produced delights me. I realize letterpress printing has become a bit of a fad in recent years, but I hope it's a comeback that can save the craft of printing, the history of printing presses, and setting lead type for future generations.

As a class, we composed a wonky poem  - each of us composed our own 3-4 word line in lead type, then set the lines together on the Vandercrook Cylinder Press. We each got a chance to make a few runs on the press with varied papers of different colors, textures, and thicknesses. Later, we got to try our hand a different press, the Platen press.

Tuesday, February 21, 2012

Counting my chickens!

This weekend I adopted two lovely chickens and now have farm fresh eggs!
Thanks to a little help from Craigslist, and a very nice woman who raised the hens from chicks who couldn't keep them through her move - I realized my dream of raising my own chickens and enjoying fresh eggs within 2 months of moving to the hills! 

After curling up to watch a classic movie, Gentlemen Prefer Blonds, on Netflix - we decided to name the chickens Marilyn Monroe and Jane Russell.
 I've been reading the chicken books, but so far it doesn't seem too complicated - and it's very rewarding! The chickens make the most soothing clucking noise when I approach, and they let me pick them up to move them no scratching, no pecking. The best way to describe the way a chicken feels is fluffy with velvety feathers, and a light yet muscular frame. 

Living up in the hills, we have all sorts of wild critters, and many of them love chickens. So far, we've seen a black fox sniffing by the hen house in broad daylight so we know we'll need to create a chicken bunker long term. For now, we've reinforced their coop to prevent digging predators.


Wednesday, February 15, 2012

A sweet event - Chocolate Tasting Party!

Yesterday was Valentine's Day - and that means it's unofficially chocolate overdose season. Chocolate has exploded as an industry since I was a kid, when you had a choice between Hershey's kisses or Hershey's bars (I am from Pennsylvania). Happily, there's someone to help us sort through the mire of chocolate options today - my friend, Christine.

Christine has been hosting her Chocolate Tasting parties since 2007, and tracking the results here. This past weekend we gathered to indulge ourselves in 54 samples of local chocolate and compare them to the favorites from last year.

Each sample chocolate is given a bird pseudonym for the tasting 

What did we learn? 

  • Swiss chocolate is delicious, 
  • Trader Joe's brand is a good bet, and 
  • Local chocolate is can be delicious, sometimes.

The winners from this year?
  1. E. Wedel Milk Chocolate from Poland (imported)
  2. Lindt Excellence Milk (available at any grocery store)
  3. Freia Melkesjokolade, the national chocolate of Norway (imported)
  4. Trader Joe's Swiss Milk Chocolate (made in the Villars factory in Switzerland)
One we didn't taste-test that is my personal favorite, and very much like the Swiss winner is the TCHO Serious Milk "Classic" with caramel flavors.
 

Monday, January 30, 2012

And... I'm back!

I'm back in 2012 with all sorts of new adventures to share! This lapse in posts was a sign I've been super busy doing some really great stuff.

Just to give you an idea of what I've been up to during the period of radio silence:
  • Serving up Turduckenfest 2012 with my good friend C. A multi-course dinner serving 3 layered birds like turducken with custom stuffings and 2 dessert courses.

    Layered birds like a Turducken9 types of stuffings
  • Making my own kitchen corset! My most ambitious sewing project yet - and an internet first. A project C and I took on together, and debuted at Turduckenfest. 
    Introducing, my kitchen corset
  • Moving to the hills overlooking the bay area. That's right, I'm trading in my San Franciscan Victorian for a spacious house in the hills on 3 acres with a hot tub overlooking the city lights.
    Beautiful view from my front yard

Saturday, November 19, 2011

Getting cozy with graphic T-shirt pillows

Before
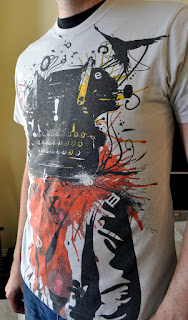
The clothes we choose to wear, our sense of style, lets us express who we are and what's important to us - they tell people a lot before we even open our mouths. In my opinion, few people have a style with T-shirts as my boyfriend. Over the years he's cultivated a wonderfully graphic T-shirt collection from DBH that's uniquely his. Neither of us wanted to part with his treasured T's, even though we agreed it was time to take them out of his wardrobe rotation.  Each T-shirt spoke to him when he bought them, and they still say something to (and about) him today. So I suggested we reuse the textile art and make them into pillows to express his personal sense of style at home.

After

Sewing T-shirts into pillow requires pretty basic sewing skills - it's mostly straight lines - and requires basic sewing supplies.


Shopping List

  • 14" pillow forms
  • Fusible iron-on interfacing (sheer weight)
  • 7-10" zippers
Each shirt had a small caption in the lower left back
We cut a 15" cardboard square to serve as a template (14" + 1" for a 1/2" seam allowance) and used that to select the best graphics for the shirt.

We really liked how each shirt has a title to the artwork - it's part of the character we wanted to preserve. Here, you can see I saved the label from the back of the shirts to include as the back of the pillow. 

Iron fusible interfacing bolsters wimpy T-shirt fabric
We then ironed on interfacing to the inside of both pieces of fabric. This gives the thin jersey knit of a T-shirt a bit more substance, and helps limit the stretching that we love about T-shirts as clothing - which makes sewing this fabric a lot easier. If you skip the interfacing step your pillow is likely to end up lumpy or misshapen and you'll need to use a knit stitch to allow for some stretching that will otherwise break straight basic seams.


Rotary cutters rock!
We found it necessary to trim again before sewing to get back to a 15" square, this time using the rotary cutter - one of my favorite sewing tools.

We place the two pieces of fabric (front & back) right-sides together. Then, drew a 14" square centered on the fabric to mark our sewing lines. We sewed the bottom first to accomodate the zipper, then sewed each side, followed by the top of the pillow. The order is important to accomodate for any stretch in the knit fabric that might distort your pillow shape.

We managed to whip up 3 this afternoon with great success! Now, if only finding new clothes was this easy...